A pea gravel patio offers the perfect blend of natural beauty, drainage efficiency, and budget-friendly construction that makes it an ideal choice for your first major outdoor DIY project. Unlike concrete or flagstone installations that require specialized skills and equipment, you can create a professional-looking pea gravel patio using basic tools and straightforward techniques.
The key to success lies in proper preparation and understanding the layered construction method that creates a stable, long-lasting surface. You’ll excavate your chosen area, install a solid base, and use a clever checkerboard paver system that provides structure while maintaining the loose, natural appearance of pea gravel.
Planning Your Pea Gravel Patio Project
Before breaking ground, you’ll need to determine your patio size, shape, and location. Choose an area that receives your desired amount of sun or shade and consider proximity to your house for entertaining and utility access. Mark your planned patio boundaries with spray paint or stakes and string.
Check with your local utility marking service to identify underground lines before excavating. Most areas require this free service, typically completed within 48-72 hours of your request.
Materials and Quantities Needed
For a standard 10×12 foot patio, you’ll need:
- Angular gravel base: 2.5 cubic yards of ¾-inch crushed stone
- Pea gravel: 1.5 cubic yards (covers approximately 120 square feet at 1-inch depth)
- Concrete pavers: 30-35 standard 12×12-inch pavers for checkerboard pattern
- Landscape edging: 50 linear feet of metal or plastic edging
- Landscape fabric: 150 square feet (includes overlap)
- Sand: 3-4 bags of leveling sand
Always order 10-15% extra material to account for compaction, spillage, and future maintenance needs.
Essential Tools for the Job
Gather these tools before starting your project:
- Shovel and spade for excavation
- Rake for grading and spreading
- Wheelbarrow or garden cart
- Plate compactor (rental recommended)
- Level (4-foot minimum)
- Rubber mallet
- Garden hose with spray nozzle
- Measuring tape
- Work gloves and knee pads
You can rent a plate compactor from most home improvement stores for about $40-60 per day. This tool is essential for creating a stable base that won’t settle or shift over time.
Step-by-Step Installation Process
Step 1: Excavation and Site Preparation
Excavate your marked area to a depth of 3 inches below your desired finished patio level. This depth accommodates the 2-inch gravel base plus 1 inch of pea gravel surface. Remove all grass, roots, and organic matter, as these will decompose and cause settling.
Create a slight slope away from your house—approximately ¼ inch per foot—to ensure proper drainage. Use a long level and measuring tape to check your grade frequently during excavation.
Step 2: Installing the Base Layer
Spread your angular gravel base evenly across the excavated area to a depth of 2 inches. Angular gravel locks together better than rounded stones, creating a more stable foundation. Use your rake to achieve consistent depth and maintain proper drainage slope.
Compact the base layer using your plate compactor, making overlapping passes in different directions. A properly compacted base should barely show footprints when you walk across it. Mist the gravel lightly with your garden hose if the material seems too dry during compaction.
Step 3: Installing Landscape Fabric
Roll landscape fabric over your compacted base, overlapping seams by 6 inches. This barrier prevents weeds from growing through your patio while allowing water drainage. Secure the fabric temporarily with landscape pins or small stones.
Cut X-shaped slits in the fabric where you’ll place your checkerboard pavers. Make these cuts slightly smaller than your pavers to maintain weed prevention around the edges.
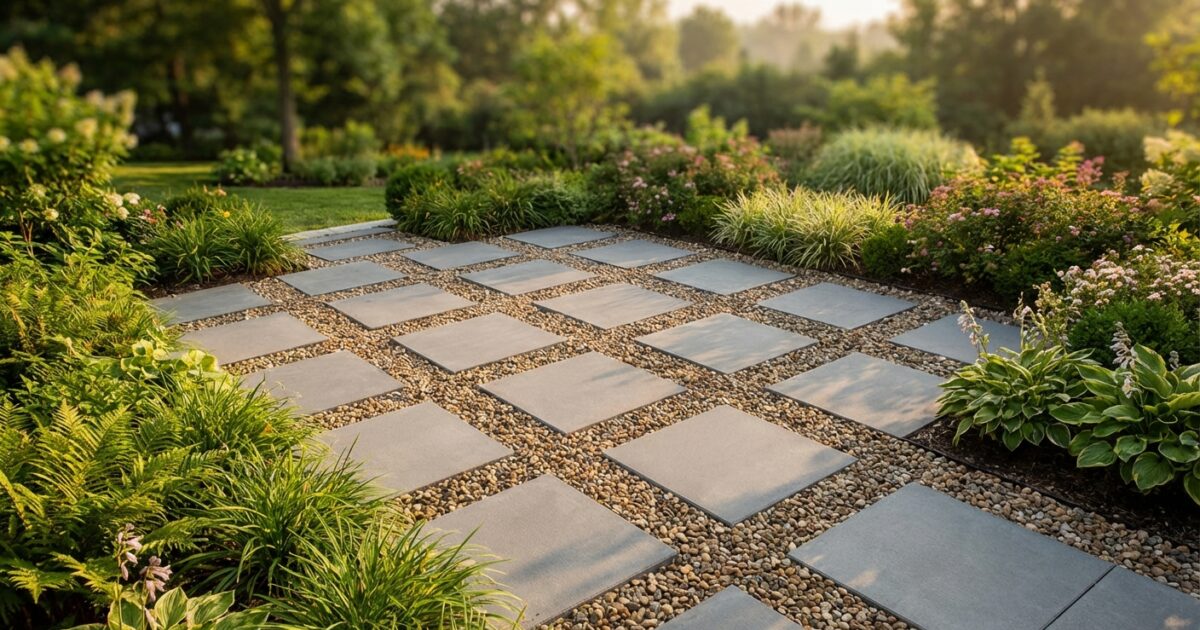
Step 4: Creating the Checkerboard Pattern
Place your concrete pavers in a checkerboard pattern, spacing them evenly across your patio area. This technique provides structure and prevents pea gravel migration while creating visual interest. Position pavers approximately 12-18 inches apart, depending on your patio size and desired aesthetic.
Use a level to ensure each paver sits flush with your intended finished height. Add or remove base material beneath individual pavers as needed. Tap pavers into place with your rubber mallet, checking level frequently.
Step 5: Adding the Pea Gravel Surface
Spread pea gravel evenly across the entire patio area, including around and between your pavers. Aim for a depth that brings the gravel level flush with the top of your pavers—typically ¾ to 1 inch deep.
Use your rake to distribute gravel evenly, then mist lightly with water and use the plate compactor on a light setting to settle the stones. Avoid over-compacting, as this can damage the decorative surface.
Step 6: Installing Edging
Install landscape edging around your patio perimeter to contain the pea gravel and maintain clean lines. Metal edging provides the most durable solution, while plastic options cost less but may require replacement over time.
Secure edging with stakes driven below the finished surface level. The top of your edging should align with your patio surface to prevent a visible barrier that could create a tripping hazard.
Pros and Cons of the Checkerboard Design
The checkerboard paver system offers significant advantages for DIY builders. The pavers create stable walking surfaces, prevent excessive gravel displacement, and allow you to incorporate plants or decorative elements in some squares for added visual appeal. This design also makes snow removal easier in winter climates.
However, the checkerboard pattern requires more initial investment in pavers and increases installation complexity. You’ll also need to maintain consistent spacing and leveling across multiple elements rather than working with a single uniform surface.
Drainage Considerations
Proper drainage prevents water pooling and extends your patio’s lifespan. Your pea gravel surface naturally provides excellent drainage, but you must maintain the slope established during excavation. Consider installing a French drain system along the low edge if your yard has drainage challenges or clay soil.
Avoid installing your patio in natural drainage paths or areas where water naturally collects during heavy rains. If necessary, redirect surface water using berms or shallow drainage swales around your patio perimeter.
Maintenance Requirements
Pea gravel patios require minimal maintenance compared to other surface materials. Rake the surface monthly to maintain even distribution and remove leaves or debris. Add fresh pea gravel annually to replace material that migrates or settles—typically 10-20% of your original quantity.
Address weed growth promptly by hand-pulling or using targeted herbicide application. The landscape fabric significantly reduces weed problems, but occasional growth may occur where organic matter accumulates on the surface.
Inspect your edging annually and reset any loose sections. Check paver levels each spring and adjust as needed using additional base material beneath shifted pavers.
Cost Breakdown and Comparison
A DIY pea gravel patio costs approximately $3-5 per square foot, making it significantly more affordable than concrete ($8-12 per square foot) or natural stone ($15-25 per square foot). Your primary expenses include:
- Base materials: $150-200
- Pea gravel: $100-150
- Pavers: $120-180
- Edging and accessories: $75-100
- Tool rental: $50-80
These costs assume you’re providing the labor yourself. Professional installation typically adds $2-4 per square foot to your total project cost.
Common Mistakes to Avoid
Inadequate excavation depth causes the most common failures in pea gravel patios. Skipping the compaction step or using rounded gravel instead of angular base material also leads to settling and instability problems.
Don’t skimp on edging installation—loose or missing edge restraint allows gravel migration that gradually degrades your patio’s appearance and function. Avoid placing your patio too close to large trees, as root growth can disrupt the base over time.
Never install pea gravel directly over existing grass or organic matter without proper excavation. This shortcut guarantees settling problems and weed growth that will require expensive repairs later.
DIY vs. Professional Installation
Most homeowners can successfully complete a pea gravel patio project themselves, especially for smaller areas under 200 square feet. The techniques require no specialized skills, and mistakes are generally fixable without starting over.
Consider hiring professionals if your project involves significant grading changes, complex drainage issues, or areas larger than 400 square feet. Professional installation also makes sense if you lack the time for proper base preparation or cannot rent necessary compaction equipment.
Get quotes from at least three contractors if choosing professional installation, and verify they understand the proper layered construction technique rather than simply spreading gravel over existing surfaces.
Tips for Long-Term Durability
Invest in quality base preparation—this single factor determines your patio’s long-term success more than any other element. Use the recommended 2-inch depth of properly compacted angular gravel, even if it seems excessive for your application.
Choose high-quality pea gravel that’s been washed and screened to consistent size. Cheaper options often contain dust and debris that create drainage problems and muddy conditions after rain.
Plan for regular maintenance from the beginning by purchasing extra materials and storing them conveniently. Annual touch-ups take minimal time but prevent small problems from becoming major repairs.
Your new pea gravel patio will provide years of enjoyment with proper construction and basic maintenance. The natural drainage, comfortable walking surface, and timeless appearance make this investment one that enhances both your property value and outdoor living experience.