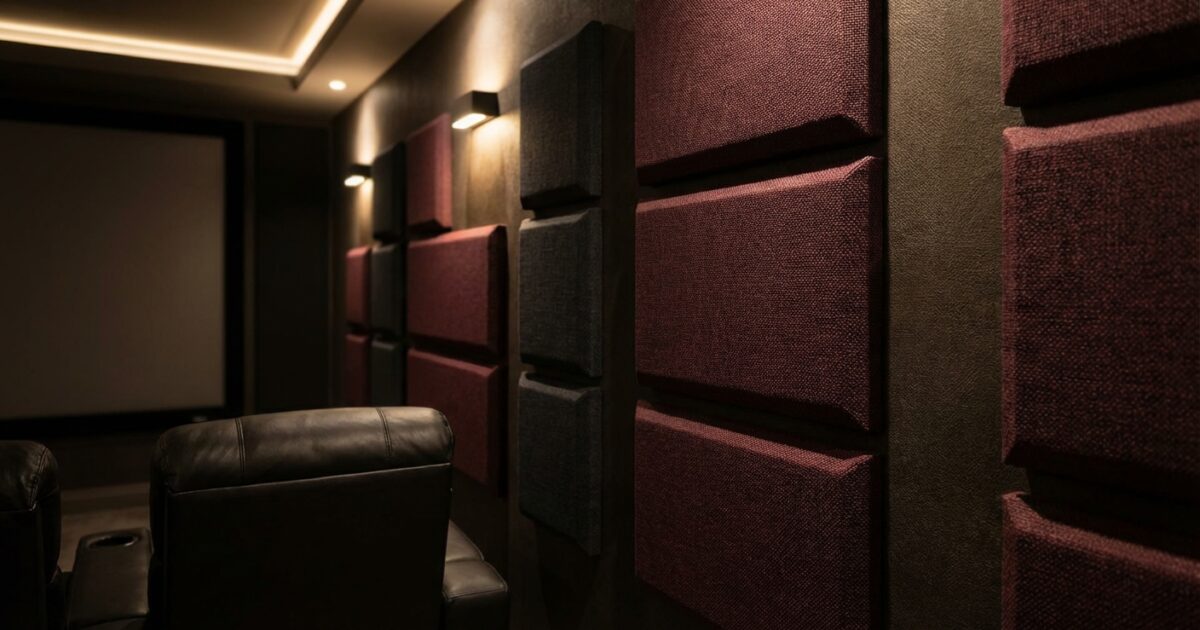
Your home theater investment deserves more than just great equipment—it needs proper acoustic treatment to unlock its full potential. Professional acoustic panels can cost hundreds of dollars each, but you can build equally effective panels for a fraction of that price while adding significant value to your entertainment space.
Acoustic treatment transforms how sound behaves in your room, reducing echoes, controlling reflections, and creating the clear, immersive audio experience you paid for when you invested in quality speakers. Beyond improving your viewing experience, thoughtfully designed acoustic panels become architectural features that enhance your home’s appeal to future buyers.
Why Acoustic Treatment Matters in Your Home Theater
Every room has its own acoustic signature based on its size, shape, and surface materials. Hard surfaces like drywall, glass, and wood floors reflect sound waves, creating echoes and standing waves that muddy dialogue and distort music. Your expensive speakers can’t overcome poor room acoustics—even the best audio system sounds mediocre in an untreated space.
Proper acoustic panels absorb excess reflections while preserving the direct sound from your speakers. This creates a controlled listening environment where you hear what the sound engineers intended, with clear dialogue, distinct instrumental separation, and immersive surround effects. The difference is immediately noticeable and dramatically enhances your entertainment experience.
The Innovative Lightweight Frame Design
Traditional acoustic panel frames use solid wood construction, which requires more materials and creates unnecessary weight. The lightweight frame design uses a more efficient approach that actually performs better while using less lumber and reducing costs.
This method creates a frame with strategically placed internal supports rather than a solid perimeter frame. The design maintains structural integrity while reducing material usage by approximately thirty percent. More importantly, the lighter weight makes installation easier and reduces stress on your wall mounting system.
The frame design also improves acoustic performance. By creating air gaps within the frame structure, sound waves encounter varied path lengths and impedances, which enhances absorption across a broader frequency range compared to solid-backed panels.
Essential Materials and Tools
You’ll find everything you need at your local home improvement store. Here’s your complete shopping list:
Lumber Requirements
- 1×3 pine boards: Primary frame material—lightweight, affordable, and easy to work with
- 1×2 pine strips: Internal cross-bracing and mounting cleats
- Wood glue: Titebond II or similar for strong, lasting joints
- 1¼-inch wood screws: For assembly connections
Acoustic Materials
- Rockwool Safe’n’Sound or Owens Corning 703: Dense acoustic insulation for maximum absorption
- Acoustic fabric: Guilford of Maine FR701 or similar breathable fabric in your preferred color
- Spray adhesive: 3M Super 77 for fabric attachment
Tools Needed
- Miter saw or circular saw
- Drill with bits
- Staple gun with ½-inch staples
- Measuring tape and square
- Safety equipment (dust mask, eye protection)
Step-by-Step Construction Process
Planning Your Panel Dimensions
Standard panels work well at 24 inches by 48 inches, which efficiently uses common material sizes. For smaller spaces, consider 24-inch by 24-inch squares. Panel depth significantly affects performance—4-inch deep panels provide excellent broadband absorption, while 2-inch panels work well for mid and high frequencies.
Building the Lightweight Frame
Cut your 1×3 boards to create the outer frame dimensions. For a 24-by-48-inch panel, you’ll need two pieces at 48 inches and two pieces at 21 inches (accounting for the thickness of the adjoining boards). Cut internal cross-braces from 1×2 material—you’ll need three pieces at 21 inches for optimal support spacing.
Assemble the outer frame using wood glue and screws. Pre-drill holes to prevent splitting, then attach corners with two screws per joint. Install the internal cross-braces at 12-inch intervals, creating four cavities within each panel. This spacing provides structural support while maintaining the acoustic benefits of the lightweight design.
Installing Acoustic Material
Cut your acoustic insulation to fit snugly within each frame cavity. The material should fit without compression—compressed insulation loses effectiveness. For 4-inch deep panels, you can layer two 2-inch pieces or use single 4-inch batts if available.
The insulation should sit flush with the frame face. If you’re using 2-inch material in a deeper frame, position it toward the back, leaving an air gap at the front. This air space actually enhances low-frequency absorption.
Fabric Installation
Cut your acoustic fabric 4 inches larger than the panel dimensions on all sides. Lay the fabric face-down and position the panel on top, centered to ensure equal overlap. Starting with one long side, pull the fabric taut and staple every 3 inches along the back edge of the frame.
Move to the opposite side, stretch the fabric firmly (but don’t over-tension), and staple. Repeat with the shorter sides, then work the corners. Fold corners neatly like wrapping a present, trimming excess fabric to prevent bulk. The finished face should be smooth and wrinkle-free.
Mounting and Placement Strategies
Optimal Panel Placement
Strategic placement maximizes acoustic benefits. Install panels at reflection points—the spots where sound from your speakers bounces off walls before reaching your listening position. You can find these points by having someone move a mirror along the wall while you sit in your main viewing seat. Wherever you can see a speaker in the mirror marks a reflection point that needs treatment.
First reflection points on the side walls are critical for stereo imaging and dialogue clarity. Place panels approximately 3 to 4 feet from your main listening position, centered at ear height when seated. Rear wall treatment helps control surround sound reflections and reduces standing waves.
Professional Mounting Options
French cleat systems provide the most flexible mounting solution. Rip a 1×2 board lengthwise at a 45-degree angle to create matching beveled strips. Mount one strip to the wall with appropriate anchors for your wall type, and attach the corresponding strip to the back of your panel. This system allows easy removal for room changes or maintenance.
For permanent installations, consider recessed mounting. Frame out shallow cavities in your wall during construction or renovation, allowing panels to sit flush with the wall surface for a built-in appearance that significantly enhances room aesthetics and home value.
Customization and Design Considerations
Fabric choice dramatically affects both acoustics and aesthetics. Acoustic fabrics must be acoustically transparent—regular decorator fabrics often reflect sound rather than allowing it to pass through to the absorption material. Test fabric transparency by holding it up to your mouth and speaking through it. If your voice sounds significantly muffled, the fabric is too dense.
Color selection should complement your room’s design while serving practical purposes. Darker colors hide dust and are less likely to show wear in high-traffic areas. Neutral tones like charcoal, brown, or deep blue work well in most home theater environments and won’t distract from your screen.
Advanced Customization Options
Consider variable-depth panels for enhanced performance. Build some panels at 2 inches for high-frequency control and others at 4 inches for broader spectrum absorption. This variety creates more effective room treatment than uniform panel depth.
Edge treatments add visual sophistication. Route decorative edges on your frame boards before assembly, or add applied moldings for a more architectural appearance. These details make DIY panels indistinguishable from expensive commercial alternatives.
Cost Analysis and Value Comparison
Your material costs will typically run $25 to $35 per panel, depending on fabric choice and local lumber prices. Comparable commercial panels range from $100 to $300 each, making DIY construction extremely cost-effective for treating an entire room.
A typical home theater requires 8 to 12 panels for adequate treatment. Building these yourself saves $600 to $3,000 compared to commercial alternatives, while often achieving superior results because you can customize dimensions and depth for your specific space.
Troubleshooting Common Issues
Frame warping occurs when lumber moisture content varies. Allow boards to acclimate in your workspace for several days before construction, and always pre-drill screw holes to prevent splitting that weakens joints.
Fabric wrinkles usually result from inadequate tension or uneven stretching. Work systematically from one side to the opposite, maintaining consistent tension. If wrinkles appear, remove staples from the affected area and re-stretch.
Poor acoustic performance often stems from compressed insulation or inappropriate fabric choice. Insulation must maintain its loft to function properly, and fabric must allow sound transmission.
Enhancing Home Value Through Acoustic Treatment
Well-executed acoustic treatment appeals strongly to today’s home buyers who value quality entertainment spaces. Professional-looking panels demonstrate attention to detail and suggest that other home systems have been thoughtfully designed and maintained.
Document your acoustic treatment in home listings with before-and-after audio demonstrations or professional photography highlighting the installation quality. Buyers increasingly recognize the value of properly treated media spaces, particularly as remote work and home entertainment continue growing in importance.
Your investment in acoustic panels pays dividends immediately through improved daily enjoyment of your entertainment system, while building equity that enhances your home’s marketability. The combination of immediate satisfaction and long-term value makes DIY acoustic treatment one of the most rewarding home improvement projects you can undertake.